Devlog 7 - Build Pipelines
Published: July 2nd, 2021
I didn't work on anything exciting this past week (menu handling, accessibility, localization, fonts...), so I thought that I'd instead do a brief run-down of the build pipelines for Rhythm Quest. Build and deploy flows are always changing (for better and worse...) so the steps here might become outdated at some point, but perhaps it'll serve as a useful starting point for someone else thinking about how to make builds and deploys more convenient.
Premise
The first thing you should understand is how painful it is to execute and deploy a game manually, without any sort of build automation or scripting. Here are the rough steps needed in order to build and deploy a new build of a Unity game for iOS:
- Switch Unity platform to iOS
- (Wait a long time for assets to reimport...)
- Start the build from Unity -- an XCode project is created (after some time...)
- Open the XCode project and create a project archive
- (Wait a long time for the build to finish...)
- Upload the archive to the App Store
- Wait a long time for the archive to be uploaded and processed by Apple
- Login to App Store Connect, approve the new build and deploy to Testflight
...and that's just for ONE build platform. Rhythm Quest supports iOS, Android, Windows 32-bit, Windows 64-bit, Mac, and Linux, so just imagine going through a similar (but different!) set of steps for 6 different builds. It's clear that we need some sort of automation structure in order to make our lives easier.
Unity Batch Mode
The first improvement we can make is to allow Unity to make builds through the command-line. This is done by creating static methods that execute the build via BuildPipeline.BuildPlayer(), then using the -batchmode, -nographics, and -executeMethod flags to run Unity in batch mode and execute that build method.
You can do a bunch of other logic in your build method while you're at it, for example reading the version number from a text file:
string version = PlayerSettings.bundleVersion;
try {
    using (TextReader reader = File.OpenText(Application.dataPath + "/Publishing/version.txt")) {
        version = reader.ReadLine();
    }
    Debug.LogFormat("Using {0} as bundle version", version);
    PlayerSettings.bundleVersion = version;
} catch {
    Debug.LogErrorFormat("Unable to read bundle version from version.txt, using {0} as version", version);
}
Or using compile-time define flags depending on build parameters, useful for something like demo builds:
string scriptingDefines = demo ? "DEMO" : "";
PlayerSettings.SetScriptingDefineSymbolsForGroup(BuildTargetGroup.Standalone, scriptingDefines);
PlayerSettings.SetScriptingDefineSymbolsForGroup(BuildTargetGroup.iOS, scriptingDefines);
PlayerSettings.SetScriptingDefineSymbolsForGroup(BuildTargetGroup.Android, scriptingDefines);
Fastlane
We can now run a Unity build via command-line, but there's still a ton of other steps that need to be done, like incrementing the bundle version number, building the XCode project, uploading to Testflight, etc. The best tool I've found to handle all of this stuff is fastlane (https://docs.fastlane.tools/).
Fastlane allows you to define different "lanes", each which will execute a given sequence of actions for your project. Here's what my iOS build lane looks like (excuse the hardcoded Unity path):
lane :ios do
  unity(
    build_target: "iOS",
    unity_path: "/Applications/Unity/Hub/Editor/2021.1.7f1/Unity.app/Contents/MacOS/Unity",
    execute_method: "BuildScripts.Ios",
  )
  increment_build_number(
    build_number: latest_testflight_build_number + 1,
    xcodeproj: "./Builds/ios/Unity-iPhone.xcodeproj",
  )
  gym(
    project: "./Builds/ios/Unity-iPhone.xcodeproj",
  	xcargs: "-allowProvisioningUpdates",
    output_directory: "./Builds/ios",
  )
end
The idea of defining a sequence of actions is pretty trivial -- you could just script that yourself if you wanted to. The real value in using fastlane is having access to the large repository of built-in functions for interfacing with the iOS and Android ecosystem.
For example, the increment_build_number command is able to automatically bump the build number of an XCode project file, so you don't have to modify it manually. Even better, the latest_testflight_build_number + 1 snippet actually executes a separate command which logs in to Testflight, pulls down build info, and grabs the latest build number, then adds 1 to it.
Fastlane also provides commands for deploying the packages once built:
lane :deploy_ios_testing do
  changelog = File.read("../Assets/Publishing/changelog.txt")
  app_store_connect_api_key(
    key_id: ********,
    issuer_id: *******************************,
    key_filepath: ***************,
  )
  upload_to_testflight(
    ipa: "/Users/ddrkirbyisq/Coding/network-share/rhythm-quest/ios/latest/RhythmQuest.ipa",
    distribute_external: true,
    groups: "ExternalTesters",
    changelog: changelog
  )
end
No need to paste your changelog into App Store Connect manually -- fastlane can automatically read it from a file and take care of it for you! No need to wait until your build finishes processing -- fastlane can poll the App Store Connect backend and automatically trigger the distribution of the new build!
Though I ran into a few minor issues with fastlane (Unity builds stalled when executed through fastlane on windows for some odd reason), for the most part it is well-documented and takes care of a lot of the annoying heavy lifting around Android/iOS deployment for you.
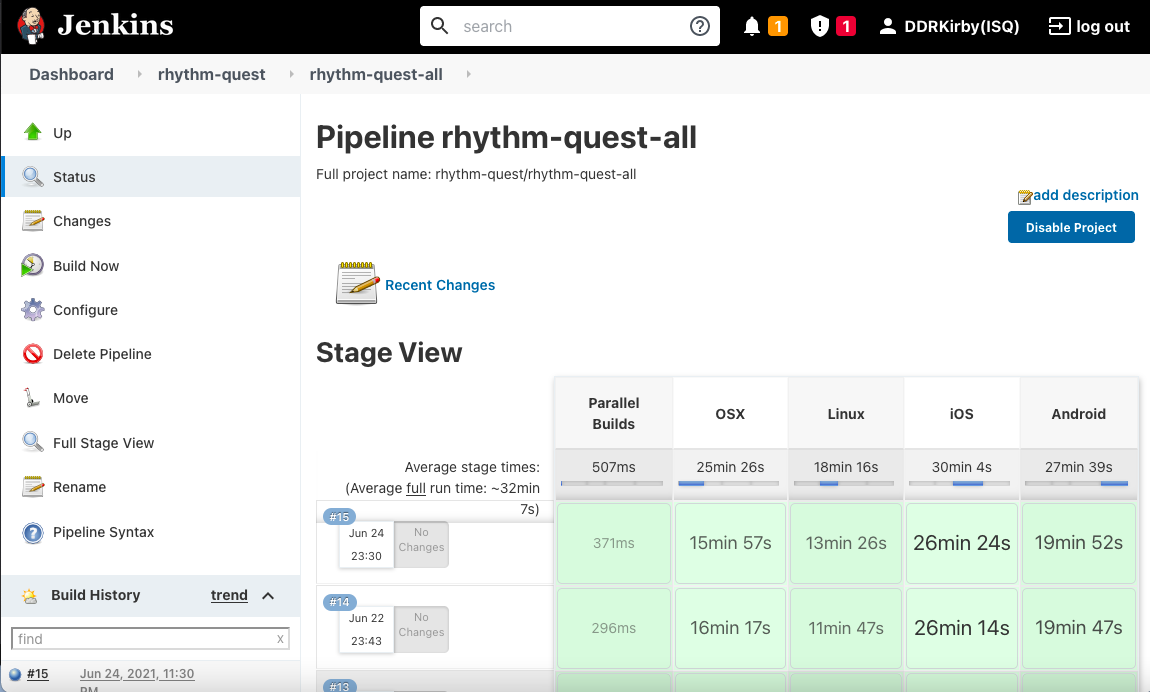
Jenkins
Now that we have nice fastlane/shell commands for doing builds and deployments, we can move onto managing our build pipelines via a more structured system. Jenkins (https://www.jenkins.io/) is an open source automation server that's commonly used for this sort of thing.
Normally in larger teams you'd host Jenkins on some sort of build machine that anyone can access remotely, but for my purposes I'm simply running it locally on my own machines and hitting it via localhost:8080.
You could of course just manually run the build/deploy commands yourself, but using Jenkins provides a number of advantages over that approach:
- Ability to manage multiple workspaces -- important since Unity can't do multiple simultaneous builds in the same workspace
- Comes with built-in integration with git -- can auto-fetch the latest commit to build, deal with submodules, etc.
- Provides simple visual indications (or even email notifications) of build status/success
- Retains console log output so you can diagnose/debug when something went wrong
- etc...
I actually have two separate instances of Jenkins running on different machines. This is an unfortunate necessity since there's currently no way to make all of the necessary builds using a single OS -- iOS/OSX builds can't be made from Windows and Windows builds can't be made from OSX. (At least there's a cross-compiler available for Linux, so I don't have to boot into a third OS...) If I was really ambitious I'd be able to manage everything through a single Jenkins instance and use one computer as the master and another as a slave, but I haven't bothered doing that since it didn't seem necessary.
Past that, I have separate Jenkins subjobs setup for each build platform, and then a single master job that will trigger each of those subjobs. Right now I only have jobs set up for the build process, and not the deploy commands, since I like to run the deploy commands manually (they don't take as long, and this lets me double-check the builds before deploying).
One issue I ran into was how to organize the builds for deployment, since some were on the Windows machine and others were build on the OSX machine. I needed to get them all in the same place so that I could for example deploy them all in a bundle to steam or itch.io.
I ended up setting up a network share and having Jenkins copy the builds into the network share once each one was complete. Setting up the shared folder is a relatively straightforward process and doesn't require any special software -- it's built-in to the OS functionality (look under System Preferences -> Sharing -> File Sharing on OSX)
Miscellaneous
While fastlane has built-in commands for deploying to iOS and Android, I still had to take care of deployments for desktop builds to itch.io and Steam.
itch.io has its own small command-line utility for pushing builds -- butler (https://itch.io/docs/butler/). butler is very easy to use and simple to integrate into the pipeline as well. My fastlane deployment setup for itch.io is therefore very simple and just runs butler 4 times via shell, grabbing the version number from a text file:
lane :deploy_itch do
  sh('butler', 'push', '/Users/ddrkirbyisq/Coding/network-share/rhythm-quest/win32/latest', 'ddrkirbyisq/rhythm-quest:win32', '--userversion-file', '../Assets/Publishing/version.txt')
  sh('butler', 'push', '/Users/ddrkirbyisq/Coding/network-share/rhythm-quest/win64/latest', 'ddrkirbyisq/rhythm-quest:win64', '--userversion-file', '../Assets/Publishing/version.txt')
  sh('butler', 'push', '/Users/ddrkirbyisq/Coding/network-share/rhythm-quest/osx/latest', 'ddrkirbyisq/rhythm-quest:osx', '--userversion-file', '../Assets/Publishing/version.txt')
  sh('butler', 'push', '/Users/ddrkirbyisq/Coding/network-share/rhythm-quest/linux/latest', 'ddrkirbyisq/rhythm-quest:linux', '--userversion-file', '../Assets/Publishing/version.txt')
end
Steam is a little less straightforward as you need to use the Steamworks SDK and set up a configuration file which tells Steam which directories to parse for the build for each build platform. This process is documented on the Steamworks site. I had a bit of trepidation as the OSX version of the command-line tools didn't seem to be as well documented (and I prefer to run most of the automation/scripting stuff on OSX), but I haven't really run into many issues there, so it's all working fine.
Summary
In the end, my entire setup and process looks like this:
- Two computers - one running Windows, one running OSX
- Each computer has a local Jenkins server
- Click a Jenkins button on the Windows box to start builds for Win32, Win64, Win64Demo
- Click a Jenkins button on the OSX box to start builds for Android, iOS, Linux, OSX
- Most of the platform-specific builds are run through fastlane
- A static Unity build method is invoked in batch mode to kick off the Unity part of the build
- fastlane takes care of updating version numbers, building XCode projects, etc.
- Builds are all copied to a shared network folder on the OSX machine when done
- Once I've verified the builds, I run deployments via fastlane commands
- Android and iOS deploys use commands built-in to fastlane
- itch.io deploys use butler
- Steam deploys use the steamworks command-line builder tool
Setting up all of these build processes and pipelines was actually one of the first things that I did back in May when I picked up Rhythm Quest again. Part of it was because I knew it would be really important later down the road, but part of it was also just because I was interested in seeing how well this problem can be solved nowadays.
If you were involved in app development years ago when Android and iOS were still in their infancy, you probably remember all sorts of horrors about having to manually deal with signing certificates, provisioning profiles, and all sorts of other such things. Tools like fastlane didn't exist at the time, so building out this sort of automated pipeline wasn't really even possible. The ability to run builds and deploys across multiple platforms by clicking a single button shouldn't be underestimated. (In fact, one of the reasons I'm moving away from Unity and towards Godot is the simple fact that Godot build times are orders of magnitude faster...)
<< Back: Devlog 6 - Spike/Teleport Enemies Demo
>> Next: Devlog 8 - Menu Rework